How to Test Element Health of Your Breville Dual Boiler or Oracle Steam Boiler
Sean GIf you are searching for a Breville steam boiler test, BES920 heating element test, or a way to diagnose an Oracle steam boiler not heating, this guide walks through the checks that matter before you replace parts.
⚠️ **DIY Installation Warning:** This information is intended for experienced users. Electrical repairs carry risk. We recommend using a qualified technician. See full disclaimer: https://brevtech.store/pages/disclaimer
If you are searching for Breville steam boiler test, BES920 heating element test, Oracle steam boiler resistance, or Breville boiler element ohms, this guide will help you confirm the fault before buying parts.
If your element tests bad or your readings point to a boiler-side fault, the most common parts I end up recommending are the Steam Boiler Repair Kit, the Steam Probe Set, and the appropriate triac kit for your machine.
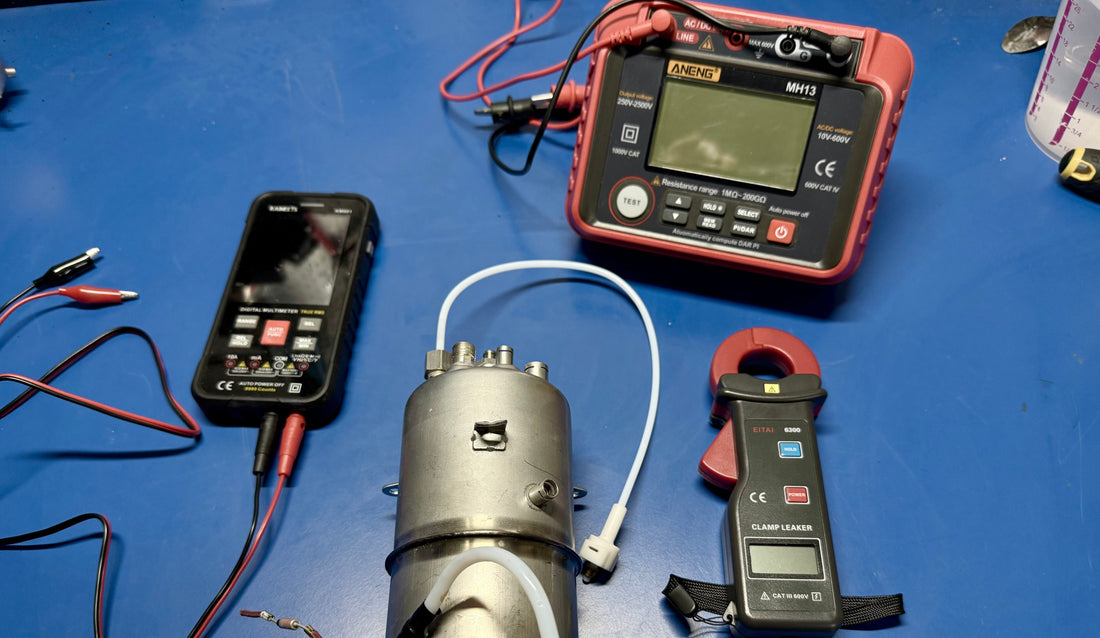
🔧 Tools Required
- Phillips Screwdriver: For removing the machine’s top cover.
- T20 Torx Screwdriver: For accessing specific screws on some Breville models.
- Digital Multimeter: With resistance (Ω) mode for basic testing (basic meter).
- Megger/Insulation Resistance Tester (Optional): For intermediate testing (e.g. Gernie Insulation Tester).
- Clamp Meter/Earth Leakage Tester (Optional): For advanced leakage testing (e.g., ETCR6300, capable of measuring mA).
If your Breville dual boiler series machine has overheated—whether due to bad sensors, failed descale, or triac issue, there’s a good chance the steam boiler heating element may have been permanently damaged.
Before you spend money and time on the repair, it’s crucial to test the condition of the steam boiler element. If the element is faulty, a whole new boiler is required, which often means the repair is almost as expensive as the machine is worth, so you may decide it's just not worth it.
In this post, we’ll show you how to check the health of the boiler element using a few different tools — starting with basic ones like a multimeter, and working up to a megger and clamp meter for more advanced diagnostics.
Why Check the Heating Element?
The heating element inside the steam boiler is encased in a metal sheath with insulation in between. If that insulation becomes compromised (often from overheating), the element can start leaking voltage to the boiler body or water. Left unchecked, this can trip your RCD, cause intermittent faults, or even pose a shock risk if the boiler isn't properly earthed.
⚠️⚠️ Importantly, these tests should always be carried out with the boiler filled and hot, if possible. Heating the element causes it to expand internally, which can reveal insulation damage that remains hidden when the element is cold and/or dry. Moisture inside the element also becomes more conductive with heat, and borderline elements often show their faults only under full operating temperature.
⚠️ Also, keep in mind that if you're testing the boiler while it’s still installed in the machine, you're also measuring the insulation resistance of the thermal fuse, thermal switch and triac board. If your test results indicate a failure, you’ll need to rule out these components before concluding that the steam boiler itself is faulty.
Option 1: Testing with a Regular Multimeter (Limited Results)
What You Need: Just a standard digital multimeter with a resistance (Ω) mode.
Steps:
- Power off and unplug the machine.
- Remove the top cover and locate the blue and brown wires connected to the steam boiler terminals.
- Set your multimeter to resistance mode (Ω).
- Touch one probe to the live or neutral terminal of the element (brown or blue wire).
- Touch the other probe to the boiler chassis (not the frame as this is isolated).
- Observe the resistance reading — it may rise slowly due to internal charging effects.

Expected Results (Multimeter Reading):
| Resistance (Ω) | Interpretation |
|---|---|
| >100 MΩ | Excellent — high chance that element should be fine. |
| 10–100 MΩ | Degrading — Boiler could need replacing soon. Recommend testing with a megger to be sure. |
| <10 MΩ | Suspect Faulty — Insulation is too low. Boiler element likely damaged and should be replaced. Recommend testing with a megger to be sure. |
🔍 Why Does the Multimeter Only Show Resistance in One Direction?
If your multimeter only shows a resistance reading in one direction — and resets or shows “OL” when you reverse the probes — you’re likely picking up signs of early insulation breakdown inside the element.
This happens because multimeters use a small DC voltage when measuring resistance. If moisture has entered the element and created a contaminated or electrolytic path, it may act like a diode or weak battery, only conducting in one polarity. This kind of behaviour is a red flag, even if your meter can’t give a precise resistance value.
A healthy element should show very high resistance (or OL) in both directions. Inconsistent or directional readings mean the insulation is compromised — and this is where using a megger or clamp meter gives you a much clearer picture.
Option 2: Testing with a Megger / Insulation Resistance Tester
What You Need: A megger or insulation resistance tester (500 V or 1000 V test voltage).
✅ The megger applies a higher voltage, which can help reveal breakdowns in insulation that a regular multimeter might miss.
Steps:
- Power off and disconnect the element wires.
- Set your megger to 500 V or 1000 V mode.
- Connect one lead to the element terminal, the other to the boiler chassis. (not the frame as this is isolated).
- Press test and read the resistance in megaohms (MΩ).
- Compare with the table further below
Option 3: (best if machine still heats up) Testing with a Clamp Meter / Leakage Tester
✅ This is a simple and useful way to uncover early warning signs of potential problems or costly repairs that might be brewing beneath the surface
What You Need:
- A sensitive clamp meter or earth leakage tester capable of measuring very low levels of mA (like the ETCR6300).
- A homemade breakout extension cord (with earth separated out)

Steps:
- Power on the machine.
- Clamp the meter around both live and neutral wires going to the boiler.
- Once the machine reaches full temp, measure the leakage and compare with the following table:
